Friday, January 29, 2010

Chad's Birthday Card

My sons birthday was last week and I sent him birthday wishes via email (he lives in Germany) but then decided that was to "impersonal" for me. Sooooo....I sat down and made him a card and sent it along. I had difficulty getting the photographs the way I wanted them to be but I think you will get the gist of it. I wish I had taken a side view of Heather's card also but... I mean well!


The card I made is from a Technique Lovers challenge off of Splitcoast Stampers and is called an easel card. I made Heather an easel card on her birthday on the 7th January and she loved it so thought I would give it a go with a masculine appeal. The directions can be found here.


The close up on the front is a hoot!


I love the sentiment on the front of the card "A Proper Vintage Gentleman" because Chad turned 34 year old on his birthday.
The muse token on the front has a C cut out that stands for Courageous(and Chad!)


The card is made out of Stampin Up! card stock basic black, real red, not quite navy, whisper white. The designer paper is from Graphic 45. I stamped the sentiment in the card using a Stampin Up! birthday stamp in basic black. The film ribbon, muse token, and chain are from Tim Holtz's collections. Dew drops are the prop that keeps the card standing instead of sliding closed. The film ribbon was a lot of fun to play with because I cut small pictures out of the DP and glued them to the ribbon and it looks like real film pics. I like the easel card because it comes with it's own stand and is so easy to make.

Wednesday, January 20, 2010

Metal Work


I took a class last year to learn how to do the metal work that I have seen so much of here lately. The class was held at a local scrapbook store here in Norman and featured products by Ten Second Studio down in Fort Worth, TX.


I have always loved the beautiful tin work ceilings found in the older houses and businesses here in the plains. There are a number of ways to get the impressions you want but Ten Second Studios sells a lot of different molds, wheels, tool sets including balls and cups that you can use to make your impressions. Here are a few of the things I created in the class. The tote is painted and then covered with a designer paper except for the front panels which are metal.


The notebook shown here started out as an old black and white thesis book that we covered with a print paper and embellished with a metal square embossed with one of the molds. Once you get the metal embossed it is adhered to the work with double sided pink tape that is called a humongo killer tape sheet!! The technique is really easier then what I thought it would be but it was nice to start with something easy like this project.


The pencil cup or vase set is premade from light weight wood. We first painted the cups and try then made a panel using the metal and whatever design mold we wanted to use. I bought a set of tools that had a lot of different instruments in it and I was able to roll the edges and make designs in the metal. The metal is already painted and after you emboss the design in it you sand the piece with a sanding block and polish it with a paper towel. The paint is removed leaving the soft patina of aged metal!


I had to try doing my name and planned on hanging it up over my desk but haven't gotten around to it yet. The house is the second item I made during the class. The metal was black and once it was sanded and polished the shine of the aluminum came through beautifully.


For some reason I couldn't get a clear picture of the glass case but the point I was wanting to make here is that the metal is so thin that it will curve around corners lying flat and smooth.

Tuesday, January 19, 2010

Punches

Everyone knows I am a big punch fan. I love punches of any sort but more specifically Stampin Up! punches! Stampin Up! has such a huge selection of punches and I struggled with a way to store them. I have found a perfect way for me to store the punches in my craft room.


I have hung shoe bags over the closet door and the back of the door coming into the room. The punches fit right into the shoe bags and are readily accessible when I need them. It may not be a solution for everyone but it works for me and I love being able to see what I have and with the Stampin Up! punches the picture on the outside of the punch is the size of the punched item!


Now everyone wants to know what I am doing with the punches. I used them a lot for a variety of things. I punch edges of paper and cardstock. I punch shapes out and put on cards and scapbook pages. I have even found a site that is most awesome and feeds the frenzy of what I do with my punches. Paper Punch Addiction the blog spot of Kim Score has classes you can take or frequently she will post tutorials on how to use the punches to create various shaped things. Kim's website is located here http://www.paperpunchaddiction.blogspot.com/


Here are a couple of items that I have cut and pasted from her site. Kim has finished items and tutorials to make these two items plus a ton of other stuff. Isn't this little penguin cute!!


This little reindeer is actually an ornament box to give as a gift. Nice!


Monday, January 11, 2010

Teresa Marie Doswell

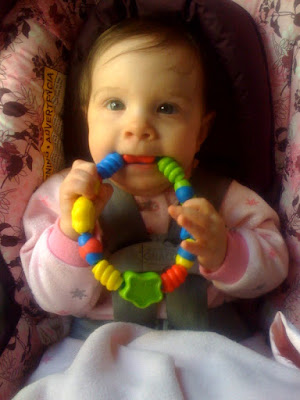
The sweet baby girl came to visit over Christmas holidays and it was such a joy to have her (and her parents) here for a visit. Teresa is only 8 months old and she is so sweet and cuddly it almost broke my heart to see her leave. Here are a couple of pics to show her off! It is truly a blessing to be a Grandparent and I look forward to more in the future!


Heather's Birthday

This week we celebrated the birth of our daughter Heather. Heather was born at 11:25 on Sunday, January 7, 1979 in Kansas City, MO. It was a horrible winter and Chuck spent a lot of time out on the drive with the snow shovel keeping it cleared in case we had to make the trip to the hospital. I can remember we made all these plans about what we were going to do and how I would come to pick him up from work if need be to go to the hospital. Good thing she was born on a Sunday cause I would never have made it to pick Chuck up and then get back to the hospital in time. Heather was born about 25 minutes after I had the one and only 'big' birthing pain.


Heather has turned out to be a 'pink' girlie girl after many years chasing around in jeans and this ratty old grey shirt she bought while in junior high school. I made her birthday card keeping the pink theme in mind and her love of chocolate in mind.

This is not a very good picture but the best I seemed to be able to get tonight. The card is an easel fold card and the card stock base is a retired color from Stampin Up! called Mint Melody. The designer paper and various accents were from things I have been collecting. I have promised myself that I was going to use up some of the papers and 'stuff' I have been accumulating over the years. I think the card turned out all right and Heather seemed to be happy with the outcome!

Simply Sent Card Kit.

Okay! Here is the first of many more to come... I promised to blog at least once a week and I will!

I went to a cropper night with my daughter Heather on Friday night. I thoroughly enjoyed myself visiting with friends and crafting. I am not much into scrapbooking but enjoy making cards, mini photo albums, and other papercraft items when I go to play. I took a card kit I bought from Stampin Up! collection called Simply Sent. There are several kits to choose from.


The Simply Sent kits contain everything you need to make the cards and all you have to do is put them together as everything is precut and the color directions make them easy to do. This kit contained the precut card stock (elegant eggplant, perfect plum, old olive, close to cocoa, and very vanilla), ribbon, 3 ink spots (elegant eggplant, close to cocoa and old olive), 4 piece stamp set, aqua painter, glue spots, Stampin dimensionals, and grosgrain ribbon(old olive and very vanilla)and the envelopes.


I added and changed some things around but basically they are the same. I don't particularly care for the ragged, torn, and distressed look they did with the cards so I used a Stampin Up! punch to make a border design and added some bling I had in the drawer. Here are my two cards. What do you think? I like them and there was enough of everything to make 10 cards.

The From the Heart card:


The birthday card:


I really enjoyed the night and the satisfaction of completing this kit in one evening.
If you are interested the kit can be purchased at www.okienurse.stampinup.net